DPU에 deploy하기 전 VART tool을 이용해 DPU inference 결과를 확인하기위해서는 다음 순서를 따르면 됩니다. 이는 VART로 DPU를 디버깅하는 과정입니다.
1. Quantization 된 inference 모델을 생성합니다.
python resnet18_quant.py --quant_mode calib --subset_len 2002. export_xmodel API의 deploy_check를 True로 설정합니다.
quantizer.export_xmodel(deploy_check=True)3. reference data를 이용해 reference 결과를 확인합니다.
python resnet18_quant.py --quant_mode test4. DPU xmodel를 생성합니다.
vai_c_xir -x /PATH/TO/quantized.xmodel -a /PATH/TO/arch.json -o /OUTPUTPATH -n netname5. DPU inference 결과를 생성합니다.
env XLNX_ENABLE_DUMP=1 XLNX_ENABLE_DEBUG_MODE=1 XLNX_GOLDEN_DIR=./dump_gpu/dump_results_0 xdputil run ./compile_model/resnet_v1_50_tf.xmodel ./dump_gpu/dump_results_0/input_aquant.bin 2>result.log 1>&2실행하면 DPU inference 결과 및 비교 결과가 result.log에 생성됩니다. DPU inference 결과를 dump 폴더에 생성됩니다. xdputil에 대한 옵션은 xdputil --help로 확인할 수 있습니다.
6. reference 결과와 DPU inference 결과를 crosscheck합니다.
모든 layer의 비교 결과 보기
grep --color=always 'XLNX_GOLDEN_DIR.*layer_name' result.log실패한 layer의 결과만 보기
grep --color=always 'XLNX_GOLDEN_DIR.*fail ! layer_name' result.logcrosscheck가 실패하면 다음 방법을 사용해서 어느 layer에서 실패했는지 추가적으로 확인할 수 있습니다.
1. DPU와 GPU의 입력을 확인하고 같은 input data를 사용하는지 확인합니다.
2. xdputil을 사용해서 xmodel 구조를 visualize 합니다.
https://docs.xilinx.com/r/2.0-English/ug1354-xilinx-ai-sdk/Using-the-xdputil-Tool
xdputil xmodel <xmodel path> -s <file name> # svg 파일
xdputil xmodel <xmodel path> -p <file name> # png 파일

optional arguments:
  -h, --help show this help message and exit
  -l, --list show subgraph list
  -m, --meta_info show xcompiler version
  -p [PNG], --png [PNG]
        the output to png
  -s [SVG], --svg [SVG]
        the output svg path
  -S [SUBGRAPH_SVG], --subgraph_svg [SUBGRAPH_SVG]
        the output svg for subgraph level
  -t [TXT], --txt [TXT]
        when <txt> is missing, it dumps to standard output.
  -b [BINARY], --binary [BINARY]
        dump the binary data to the output directory, when  is missing, it dumps to 'binary' directory
Vitis-AI 도커환경에서는 먼저 graphviz를 설치해야합니다.
sudo apt-get dist-upgrade
sudo apt-get update
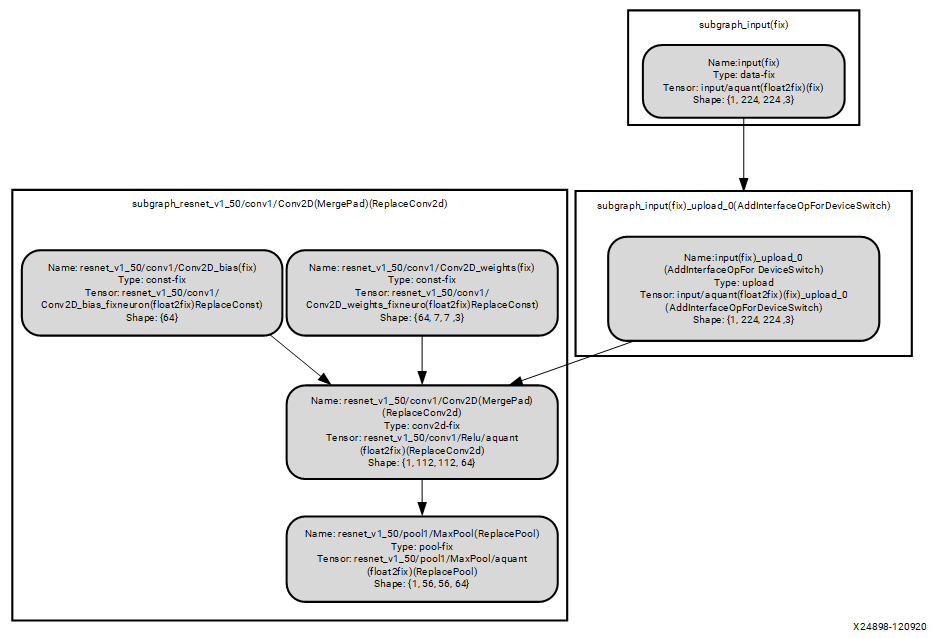
sudo apt-get install graphviz이렇게 생성된 이미지에는 아래와 같이 수많은 상자들이 있는데 각 상자는 DPU의 layer를 의미합니다. 마지막 op의 이름을 확인해서 GPU dump 결과에서 대응하는 것을 찾을 수 있습니다.
'Xilinx' 카테고리의 다른 글
| [Vitis-AI] Custom operator 등록하기 (0) | 2022.12.02 |
|---|---|
| [Vitis-AI] 설치 및 환경 설정 (0) | 2022.11.01 |
| [Vitis-AI] Compiling the Model (0) | 2022.11.01 |
| [Vitis-AI] Quantizing the Model (1) | 2022.11.01 |