사용된 함수 중에는 XIR로 변환할 수 없는 함수들도 있습니다. 이 함수들은 자동으로 변환할 수 없기 때문에 custom op로 등록해줘야만 변환하여 CPU에서 동작시킬 수 있습니다. 이 과정을 정리합니다. 이 글은 다음 글을 참고하였습니다. https://support.xilinx.com/s/article/Custom-OP-complete-example-design-for-Pytorch?language=en_US
Vitis AI Custom OP example design with Pytorch
Vitis AI Custom OP complete example design with Pytorch This tutorial was designed to help with quick and gradual learning: the user can push a button and (hopefully) the helper scripts will download the dataset, train the model, quantize etc... and finall
support.xilinx.com
1. 기존 모델에서 변환 불가능한 함수를 직접 정의합니다.


함수의 첫번째 parameter는 "ctx"로 설정해야 합니다. 그리고 이 함수를 @register_custom_op decorator를 이용해 decorate 해줍니다. 이를 통해 operator 그룹에 custom OP로 등록됩니다. 이때 함수는 단 하나의 output tensor만이 허용됩니다. 함수가 attribute를 가지면 두 번째 이미지와 같이 decorator의 attr_list에 선언해주어야 합니다.

모델을 학습할 때는 custom operator는 backward 연산을 할 수 없기 때문에 이미지의 forward 함수에서 보듯이 원래 함수를 사용해야 합니다.
2. Quantization
Custom operator를 위와 같이 등록한 뒤 quantization은 기존 상황과 동일하게 진행합니다. 이때 deploy 글에서와 같이 디버깅하려면 quantizer.export_xmodel의 deploy_check를 True로 설정합니다. 제대로 등록됐다면 quantization 실행 로그에서 custom op로 등록됐다는 메시지와 custom operator가 float operator임을 확인하는 노란색 메시지가 추가로 표시됩니다.

3. Compile
컴파일 단계도 기존과 동일합니다. 대신 아래와 같은 노란색 메세지가 추가로 표시되어야 합니다.

컴파일 완료된 모델은 xdputil을 이용해 텍스트나 그래픽 모드에서 모델을 검사할 수 있습니다.
# 텍스트 파일
xdputil xmodel customcnn.xmodel -l
# svg 형식
xdputil xmodel customcnn.xmodel -s customcnn.svg
# png 형식
xdputil xmodel customcnn.xmodel -p customcnn.png
또는 Netron을 사용할 수도 있으며 여기서 확인해야 하는 중요한 부분은 입력 및 출력 tensor의 이름과 operator 이름입니다.
4. Operator 등록 (Python)
먼저 vart_op_imp 폴더를 생성합니다(이 폴더 이름은 바꾸면 안 됩니다). 그리고 __init__.py 파일과 custom op 파일을 그 안에 생성합니다. 여기서는 ggsigmoid.py로 예를 듭니다. 다른 custom OP 모두 이 폴더에 추가합니다. 타겟 보드에서 수행합니다.
mkdir vart_op_imp
touch vart_op_imp/__init__.py
touch vart_op_imp/ggsigmoid.py
touch vart_op_imp/<다른 custom op>.py
이제 custom OP를 해당 파일에서 구현합니다. 여기서 사용한 예는 element-wise sigmoid 함수입니다.
import numpy as np

class ggsigmoid:
    def __init__(self, op):
        print("ggsigmoid init ...")

    def calculate(self, output, input):
        np_output = np.array(output, copy=False)
        np_input = np.array(input[0],copy=False)
        input_shape = np_input.shape
        batch, channel, height, width = np_input.shape
        for b in range(batch):
            for c in range(channel):
                for h in range(height):
                    for w in range(width):
                        np_output[b][c][h][w]= 1/(1+np.exp(-np_input[b][c][h][w]))
마지막으로 symbolic link를 생성해서 개별 이름으로 operator를 등록합니다. 그리고 vart_op_imp 폴더를 Python path에 추가해서 operator 등록을 끝마칩니다. 타겟 보드에서 수행합니다.
ln -sf /usr/lib/libvart_op_imp_python-cpu-op.so /usr/lib/libvart_op_imp_ggsigmoid.so

cp vart_op_imp/ /usr/lib/python3.8/site-packages/ -r # python 위치에 맞게
5. Op check
quantization 단계에서 나온 dump 된 golden file과 custom operator의 결과를 비교합니다. 모델과 reference 데이터 파일을 대상에 복사하고 다음 명령어를 실행하여 dump output tensor를 얻습니다.
# dump output tensor
xdputil run_op CNN_copzcu102.xmodel CNN_cop__CNN_cop_input_3
다음 명령어를 실행하여 dump 파일과 golden output 파일을 비교할 수 있습니다.
# compare output tensors
TARGET> xdputil comp_float ./golden/CNN_cop__CNN_cop_input_3.bin dump/CNN_cop__CNN_cop_input_3.bin  --verbose
6. Model deployment
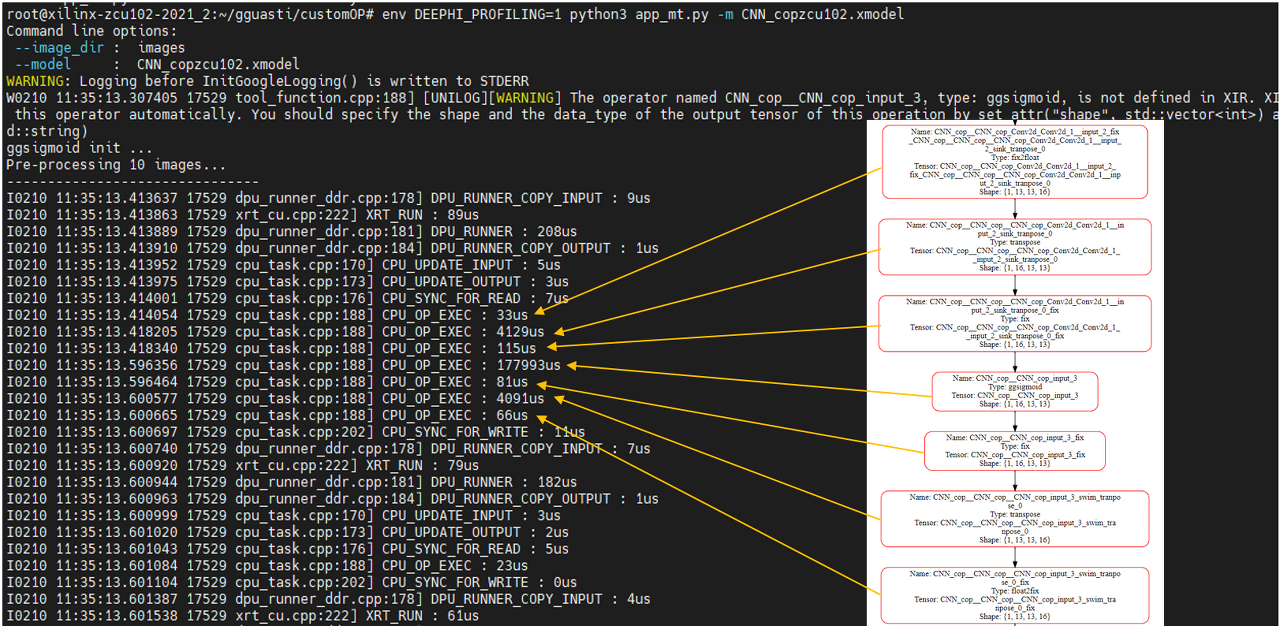
이제 target에서 필요에 맞게 작성한 run 스크립트를 실행하여 모델 inference를 실행할 수 있습니다. Custom operator가 포함된 경우 API는 Vitis AI 1.4에서 도입된 graph_runner가 권장됩니다. Graph_runner는 dpu_task 및 cpu_task 기반입니다. 이는 dpu-subgraph unit만을 실행하는 VART API와는 반대로 custom operator의 사용을 단순화하기 위해 전체 graph unit를 실행합니다.
실행에 환경변수 DRRPHI_PROFILING을 활성화하면 각 operator에서 걸린 시간을 알 수 있어 시간이 오래 걸리는 부분은 어디인지도 확인할 수 있습니다.
'Xilinx' 카테고리의 다른 글
| [Vitis-AI] Deploying and Running the Model Compiler (0) | 2022.11.28 |
|---|---|
| [Vitis-AI] 설치 및 환경 설정 (0) | 2022.11.01 |
| [Vitis-AI] Compiling the Model (0) | 2022.11.01 |
| [Vitis-AI] Quantizing the Model (0) | 2022.11.01 |